Stuff I've done or am working on( )
)


Shorts Mk.1
I made shorts as my first sewing project. Shorts are small so figured that even if things go terribly it wouldn't be too big of a waste. Also I haven't really liked any of the shorts I've owned but making my own could fix that.
[sewing tests]I followed a pattern and shortened the legs quite a bit(adjusted the pattern a bit and then still unsatisfied ended up cutting off sections before sewing the pant hem) not realizing that I could've and should've lowered the waist too since there was plenty of space around the crotch.
Made couple of minor mistakes while sewing, the cloth being stretchy made it kind of hard to prevent it from bunching up occasionally as it's sewn.
[badly sewn bit]Stitched a bucko to top of the left front pocket using a chain stitch(it does look decent but it kind of makes me worried with how each stitch seems to depend on the surrounding stitches, feels like if one breaks all of them will. But I've never stitched anything before so maybe it's fine.).
 [practice bucko on the cutoff section of the pantleg]
At first I didn't really like how low the crotch was and how that hindered my mobility but then I realized that instead of having the waistband where I usually keep it I could just raise it and ended up quite liking how that looked, especially if I tucked in a shirt under the shorts.
[worn low-waisted] [worn high-waisted] [high-waist+shirt tucked in]What I did like instantly is the size of the pockets, felt like I could safely put stuff in them and not really worry about anything falling out.


Also used the extra cloth from cutting the pattern to (in retrospect kind of terribly) fix up an old cloth bag I made in elementary school. The bottom of it was starting to come apart and there were couple of holes in it.


Shorts Mk.2 WIP
This time I'll actually lower the waist and document the creation a bit better.
One issue with Shorts Mk.1 is that when raised as high as possible the seam in the middle of the crotch presses on me in a bothersome manner. So I'm going to try to prevent that by adding a third piece to the front so that instead of one seam in the middle there'll be two to the sides.
Also wanted to thin the legs a bit so folded the edge like so.
![[image of the fold on a pattern paper]](/img/_.jpg "Fold on the pattern paper")

So, done cutting the cloth and tested the fit by basting the main pieces together. I might have lowered the waist slightly too much, I did measure that I wanted about 8 cm less but rounded that up to 10 cm. But that's without the waist band and I think I can just make that a bit bigger if it needs to be and being a bit low-waisted isn't too bad either.

The yellow cloth I'm thinking I might use for waist and bottom of each pant but not sure about it.
Oh, seems like I forgot to add seam allowance for the pockets. Or I did add it but after I realised I cut it in the wrong direction I forgot about it and re-cut the pocket without it. Not sure what if anything I should do.
Decided to be smart and actually sew the bucko on the pocket first, as nice as embroidering it by hand was using a sewing machine should be much faster. Also going to add one to the backside too I think, reason I put the first one on the front pocket was that I wanted to easily see it myself but it gets easily obscured and while being larger and lower on the pocket might help a bit doing a 2nd one on the butt seems even better.


Tried doing it like this but didn't like it.
![[Pocket Bucko front]](/img/shorts-2-pocket-bucko-1-front.jpg "Pocket Bucko, don't mind the unused markings")
![[Pocket Bucko back]](/img/shorts-2-pocket-bucko-1-back.jpg "Pocket Bucko, see? Without the markings it looks fine, well aside from one leg going too far into the body but that's fine.")
Did the body first but it didn't come out as circular as I wanted so rotated things a bit to make the bump be at the top where it looks much more natural.
Wasn't sure how I wanted to do the eyes, tried to figure out a good way to make them look like they're closed but it's really hard to go slow enough with the sewing machine I'm using to make them small enough.
Sewing circles is hard. Eyes are hard to do too. Legs aren't too bad, the way I did them is out from the body with triple stitch(the one that has 3 horizontal lines in the image) and then back to body with straight and out again with triple. Some mistakes happened but that's fine, they add character.
![[Butt bucko body]](/img/shorts-2-butt bucko-body.jpg "Butt bucko body")
![[Butt bucko (- -) bad eyes]](/img/shorts-2-butt bucko-scuff-eyes.jpg "Butt bucko (- -) bad eyes")
![[Butt bucko eyes done!]](/img/shorts-2-butt bucko-eyes-done.jpg "Butt bucko eyes done!")
![[Butt bucko done, front]](/img/shorts-2-butt bucko-done-front.jpg "Butt bucko done, front")
![[Butt bucko done, back]](/img/shorts-2-butt bucko-done-back.jpg "Butt bucko done, back")
![{Some more test sewings]](/img/testcloth3.jpg "Some more test sewings")
Next I should figure out what I'm going to do with the pockets, I could connect them back to the original pieces and not care about the stretch being in different direction than the rest or I could just use them as is and carefully use as little of them for seam allowance as I can.
Decided to connect them. Did it like you'd do most seams and turned the edges to seamy side and sewed them together there so none of the stitch shows up outside, considered just placing them on top of another.
Doing that did leave a hole and after doing my best to make one seem like it was meant to be there decided to add a loop over it.
Done sewing the pockets to the front pant pieces.
Didn't get around to working on this for a while and left it in a box I had in the classroom for a while and apparently something dripped on it at some point. Spent a while trying to clean it up but it was going quite slowly and eventually realized that it wouldn't be the end of the world to just leave it, it's not exactly visible and depending on how I do things it might get folded in for the most part.
Was I actually planning to use the yellow bits for the pant hems?

Exercise Ball Cover Mk.1
Made a cover for an exercise ball. Exercise balls are fun, you can sit on one and have fun keeping your balance while you use a computer or do whatever and you could do bunch of other fun things but the surface feels yucky so wanted to make cover.
Did it following this (tutorial)[] for the most part.
I made it like this [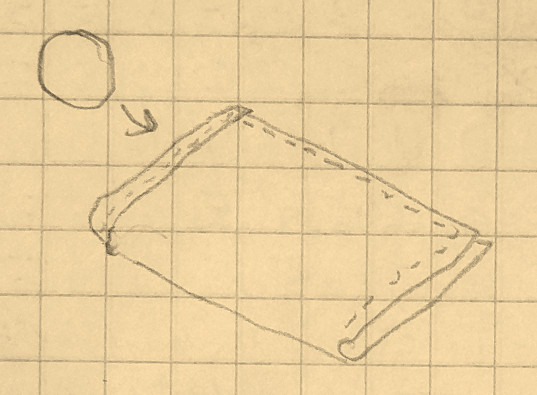 ] instead of like this [
 ].
].
So sewed two edges in one go instead of each separately but the folded edge being at the "top" would have been more symmetrical and stress the seams less .
I ended up making the elastic band a bit too tight it's bit of a struggle to get it around a 75cm exercise ball. Considering I realized I could use one of these things [image] to tighten it further I really could have been much more generous when measuring it.
I wasn't sure if I wanted to make the handle and considered dealing with the corner bits some other ways but decided to give it a try and kind of lazily just sewed them together without even removing the exercise ball from the cover. 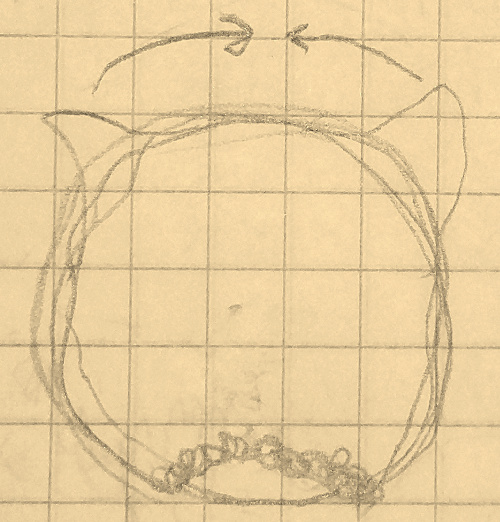 Could have connected them more nicely, I don't think it'll feel very nice if I end up pressing against that part but I am quite glad I at least gave it a try since the handle is much more verstaile than I expected, I can use it to swing the exercise ball around, I can use it as a shoulder strap to carry the ball hands-free or if I don't mind looking a bit silly I can even put it around my waist to have the exercise ball behind me ready to be sat on wherever.
Exercise Ball Cover Mk.2
I'm not really a fan of how the cloth I used in Mk.1 looks so I want to make another one that looks nicer while also trying to correct anything else I don't like about it.
That means:
- Fold and entrance on opposite sides.
- Nicer and more neatly sewn handle.
- Longer elastic band.
- Thicker.
- Cloth that's easier to get a grip on.
Hmm! I was a bit hesitant about adding any kind of pattern or such to avoid adding unnecessary bumps and imbalance but if instead of embroidery or applique I dye or paint what I want that shouldn't be a concern.
Totebag
 Originally made this at some point of elementary school but recently fixed the bottom of it that was coming undone.
Totebag
 One of the first things I made at my vocational school.
Felt Image

Pincushion

Felt Pouch

Folded Bag

A bag with no seams aside from the one attaching the zipper and loops at the ends. The ends are simply folded up in such a way that they give the bag a boxy shape.
Laptop Bag with a lining

Having used a fabric with a nice pattern as the lining made me realize that it adds surprisingly much to how much I like the item.
Laptop cover/sleeve
The bag I made is nice but a bit too small and doesn't have a place for anything else that I'd like to bring with my laptop so I'm thinking I'll make one that's meant to be kept on even during use(I saw some that wrapped around the inner corners when looking into if I could change the color of my laptop case) and has pockets for stuff like my external SSD and my trackball mouse.
So:
- Cloth that covers back of the screen, let's call it the top part.
- Stuff that wraps around the bottom part of the laptop so a bottom part.
- Pocket in the top part that perfectly fits my SSD behind the screen that lets me keep it connected without worrying about it getting separated when I move the laptop around.
- Maybe another pocket on the top part for my powerbank.
- Detachable thing to keep my charger and mouse in(no need for their pocket when using the laptop).
- Bottom part probably should have some holes for cooling and microphone.
- Could some material firmly connected to the bottom potentially work as a heatsink?
- .
Simple Bag

A simple bag I made to practice doing zippers.
Tiny Felt Toys

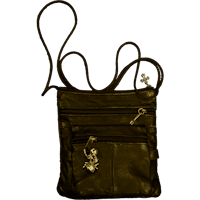
Leather Pouch
After I had managed to cut the string of this pouch decided to break it apart and try making another one like it. The spider I bought from Habitare but lost it quickly as the latch it used wasn't the best.
Waist Apron

Light Blue Vest
Found this red vest at a textile recycling center.
![[Very nice vest I found!]](/img/vest0.jpg "Very nice vest I found!")
Absolutely fell in love with it and became determined to make something like it myself. But since I probably won't make it perfectly on the first attempt decided to treat mark 1 as mostly a prototype but one that should still be decent enough to see some use.
Figuring out how exactly it had been made was interesting. There's about 4 meters of bias binding that appears to have been partly stitched by hand making the stitch basically invisible on both side. For Mark 1 not going to do that myself, I'll just use machine and pick good thread color that isn't too noticeable.
Another interesting point is how the pocket is part of the side seam. Also on the inside the breast pocket forms just from the pocket's lining continuing to the edge instead of unnaturally ending before the edge.
For the applique decoration on the back, which in the original was a bit crooked(presumably the reason it ended up being recycled), decided to embroider a sort of snowflake mandala. Decided to aim for a cooler and more wintry overall style with the idea being to have something to use with clothes that don't fit that well with the red vest.
![[Embroidered snowflake]](/img/snowflake-embroidery.jpg "Embroidered snowflake")
Getting the measurements exactly right feels important so going to pay extra attention to that.
Is there anything that I should do to ensure that the upper chest area can be nicely folded?
Might have made the inner pocket opening a bit too small.
Using wool fabric for the applique resulted in it shrinking a bit when washed.
Eventually, after my mum had suggested it, decided to rip the applique and resew it to make the fabric around it smoother.

Khaki Vest
I needed to do something as a skills demonstration and a friend of mine wanted me to make a vest for him so I made this.

Vest Mark 2
Planned differences from first vest:
- Red or violet main fabric.
- Bias binding made from cloth that feels nice to touch and is smooth.
- Drawn patterns/symbols(acrylic crayons coated with ___ and ironed to attach it)
- Shorter hem.
- .
Fabric I made with a loom

Bucko bag
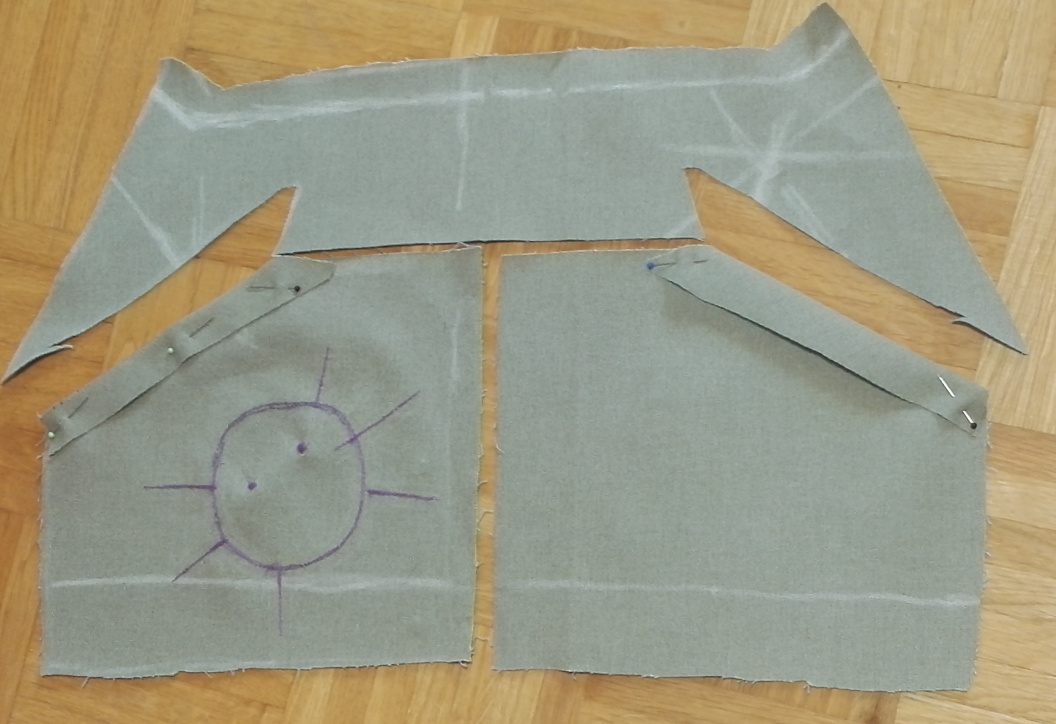
Had to think of something to make out of the fabric I weaved using a loom and after some brainstorming and thinking decided on a bucko shaped messenger bag and/or backpack.
Wasn't sure how I'd get the legs to be round in the way I want them to be so after some testing made a prototype of the idea.


It seems to work but might be too floppy so will need to figure out some way to make them firmer. I could just fill the legs but I'd prefer for them to be hollow so I'm thinking I'll try using some firm interfacing that my teacher suggested
The lining probably should attach in more places to prevent it from moving around too much but not sure how I want to do that.
Skirt

.
Dungaree Pants
Was supposed to do pants of some sort so sketched out a few ideas.
And decided to do dungarees/overalls where instead of a bib there's a cut that lowers the top of the pants at the front quite a bit compared to the sides.
![[piirrustus]](/img/t/housut/piirrustus.jpg "piirrustus")
![[tunnelmakuva]](/img/t/housut/tunnelmakuva.jpg "tunnelmakuva")
![[housut]](/img/t/housut/housut.png "housut")
![[rakennekuvat]](/img/t/housut/rk-korjattuB.png "rakennekuvat")
![[kangas]](/img/t/housut/kangasta1c.jpg "kankaan leikkuu")
Wanted the straps to have multiple possible arrangements and that turned out quite well. Especially after I added extra buttons to the sides and more buttonholes to the straps.
Have some strap loops and buttons remaining that I'm thinking I'd add somewhere.

Sewing Tools Bag

Our teacher made each of us a simple bag to keep our sewing supplies in and I quite liked it and when the opportunity came decided to add a strap and some extra pockets and decorations to it.
The strap I made from some matonkuteet(strips of cloths usually used as rag rug yarn) by braiding them using a method I learned from a woman who came by to our local congregration's craft circle. Attaching it to the bag was interesting, looking at it now I'm not sure why I did it like that.
Very happy with the 2nd bag/pocket I added to the front. Got to use some of the cloth I made myself with a loom!
To the 'back' of the main bag I added a bucko by needle felting it and on the inside of the bag I added a small inner pocket to cover the spot it's in, been using that pocket to store my bobbins so quite like it.
[I should have photos from making of this somewhere that I'll hopefully get around to adding here someday.]
When I went to Derry to make Halloween costumes and such ended up going to Primark there and bought this small Kuromi pouch, thinking it'd be nice use of it attached it to my sewing bag and I haven't felt the need to take it off but at the same time haven't really been making use of it so not sure if I'll try changing what I keep there or just attach it to something else.
Been starting to feel the need to expand my sewing bag in some way. I keep my small scissors in the small 2nd pocket and my cloth scissors in the main bag which is nice but I also have big non-cloth scissors that I'd like a separate spot for and in general tend to end up having more stuff in each pocket than is ideal. Also got some fabric recently that might make a decent extra pouch. So currently thinking make another inner pocket to help organize things better in the main bag and add a 3rd bag outside that I can fit big scissors inside of. Another thought is that could add a divider of sorts to the main bag too, since the ends of the bag fold inwards a decent amount adding one seems simple enough.
Having a spot/pocket for pincushion... wouldn't be bad though not sure it makes much sense unless it's just something that clips/attaches it outside of the bag but at that point it'd risk the pins catching on something and coming loose as the bag moves around so just tossing it inside the main bag is probably the best option, although it's not super easy for the pins to come loose from the cushion and it hasn't been an issue when wearing it as an armband but not eager to test that too much.
Set of Green Lined Totebags

Realized I had enough striped green fabric to make total of 4 totebags like the last one so made a couple but haven't found the time to do the last two. The sides have super thin pockets in them mostly due to how I wanted to cut the fabric as little as possible but to still have a box shape so the ends have two layers where it was natural to add a pocket.
Prototype Teddy
Prototype teddy I made.

.
Teddy
Made a teddybear out of leather.

.
Turning the leather inside out was bit of a challenge.
Finally added a strap that I stole from my phone's cover.
Next I'm thinking of making a plushie where the seams go along the front and back of legs.
Dogsuits
During an on-the-job-training did some clothes for dogs.
One part:
 Two part:
 Raglan sleeves:

In retrospect should've used different fabric for sleeves of the raglan one so you could actually see that the sleeves are raglan ones.
Getting to use ribbing for the first time was neat.
Detachable collar prototypes
Decided to do set of dress shirt collars.
Cut up a bedsheet to do bunch of tests and prototypes
First wanted to see what if I just cut a rectangle and then a circular hole in the middle of it and used that as the bodice to attach a simply folded strip as the collar.
Detachable collar
At first made this just based on a collar making exercise but didn't think to consider if it'd fit me so not wanting to waste the nice fabric I used decided to extend it by cutting the C.B. line and attaching a strip of fabric there .
I think the front being slightly wider at the bottom looks kind of nice, might want to have that in other collars I make.
Collar

Collar

Collar

Bunny mask

Arm Sleeves
Arm sleeves/warmers or fingerless gloves that have holes for watches.
.
Fixes and adjustments for theatre
For on-the-job-training helped with costuming a summer play.
Got to do all sorts of fixes and adjustments.
Removed earflaps from a cap.
Did waist aprons.
Added lace to things.
Changed elastic bands.
Repaired/Redid collars and cuffs.
Made knee breeches.
Shortened shirts and pants.
Did pocket hearts.
Identified repair needs of a vintage dress and did the fixes.
Outfit
Aaaaaaaaaaaaaaaaaaaaaa, my teacher hates me working on this page! Not really, but nearly everytime I've thought let's document current state of what I want to do or such she's been there to ask or comment about if I'm making progress which usually gets me to drop the thought and switch to trying and sometimes succeeding to focus on actually doing stuff. Soo now that I've finally found myself updating this I'll do my best but there's a lot to say and recall.
Idea:set of clothes that belong together and look nice and unique. Ideally representing and showing off things I'm passionate about
What colors do I want? All of them! But only like two or three at once.
For some course had to design a logo, let's use some version of that! Wanting to display my desire to make soft robotics plushies feels helpful to actually decide what to do.
Dotted lines(visible decorative long stitches) are great! They nicely highlights handcrafted nature of things.
I like Zelda games. When looking through some fabric scraps I have for stuff to embroider or stitch into the outfit found bright yellow rectangle that I could make triangles out of!
You can do embroidery that looks like circuitry!
I'm supposed to get this sort of done before summer(2026) so while I want this to eventually include all sorts of pieces need to pick just a few main ones to focus on for now.
Making a plushie that also has the same outfit would be suuuper cool! But no way I'll manage that before summer so sadly that'll have to wait. That thought did raise some interesting thoughts about what and who will my next plushie be, is it supposed to be me or something else?
Tungsten is heavy. I might get some to add weight to things.
With my teacher's request of doing something that won't take forever in mind ended up with a compromise of let's do a two part top/shirt thingy where the part that covers chest, belly and back can be removed so for now I'll worry just about the top part of it with the idea that later I'll make the lower part of it that has all the cool embroidery and whatever else I want on it.
For attaching the two parts of the shirts I was initially thinking buttons but then realized they'd end up beind around midback which might make laying down while wearing it feel bad. I did consider just removing the whole back section and seeing if something like a vest you wear with backside on the front would be reasonable or just making only the front part detachable but after discussing that my teacher suggested using eylets or grommets instead and that seems good in various ways. Snap fasteners and eylets are cool! (If I were to make another Vintage Story mod I might do one that adds grommet crafting and use.)
Prototype of the shirt revealed that there needed to be slightly more room at the front
Since idea is to have most pieces use at least bit of the same fabric "had" to draft pants too before I could acquire a fabric to use.
Figuring out what structure I want the pants to have is tricky.
Since the shirt will have eyelets thought about replacing side seams of the pants with eylets and cords so that both would have eyelets but then I considered how that'd function in practice and thought better of it. For now at least, still want to test that at some point.
Zipper on the back can look quite nice which makes the fact that I can't have one at the front a nice excuse to do that. I did consider instead of eyelets that sides could have a cut at the top and some strips you tie to tighten the waistband but thought better of that too since tying them... while probably sort of fun in some cases could be a pain in others and the fact that they would've made a back zipper superfluous also played a role in deciding against that... Or hmm... Tempted to reconsider doing a back zipper now since zipper seems best when it's fitted and I do kind of want freedom to vary the waist a decent amount. Hmm! I did have the thought that there's a reason why cords inside waistband are so common but the ends of that don't have to be at the front so what if I had them at the back? That would to some extent achieve the look I wanted a zipper and a button for while giving me the freedom to adjust the waist based on how many layers there are are below and such.
For the fabrics ended up getting a light blue and green ones but since I specifically asked for cotton fabric didn't think to ask if the ones I was shown and chose were actually cotton and turns out that the green one for sure isn't one based on burn tests by me and my teacher(I should figure out some system/process and a spot for doing those).